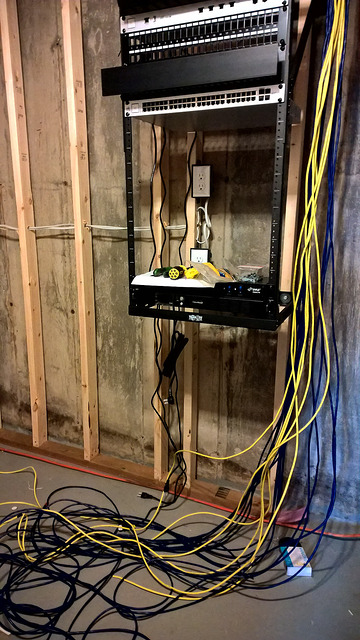
As you can see in the picture, I didn't just terminate cables in a mechanical room and mount a few pieces of hardware directly to a wall. Instead I got a wall mount rack to organize everything in. The rack I chose had to meet a few base criteria:
- standard
Usizing so mounting equipment would be easy - significant number of
Us to fit current and future equipment - easy open access for setup and maintenance
- enough depth to accept the networking hardware I had chosen
In the end I got a Tripp Lite rack that I could lag into some wall studs and fill with up to 150lbs of equipment. The one thing that is weak on this kind of solution is the cable management options. There are no cable raceways down the sides that you can use and third-party options are limited if they exist at all. If you look closely at the picture you can see that I ended up having to velcro strap the cable bundles to the rack posts and supports to be able to maintain some semblance of cabling hygiene.
Getting the rack setup was pretty easy, but I did run into one issue that slowed me down. The rack has threaded holes for mounting, not holes for cage nuts. The threaded holes are ever so slightly smaller than those in cage nuts which made it impossible to use the bolts that came with most of the hardware I was mounting. If I were to do this again, I'd make the effort (and pay the necessary price) to get a wall rack that used cage nuts.
In addition to mounting the rack on the wall I had the electricians (who pulled all my Cat6 cabling) put two plugs on the all behind the rack. The plugs are on separate circuits for future expansion and/or high draw equipment. As of now, I only need one but I did not want to have to watch someone pounding nails or running screws behind my rack in the future. I'll cover the whole power system in another post, but safe to say it's not just a bunch of wall-warts plugged into power bars.
The last pieces added to the rack were accessories; horizontal cable management, shelves, and blank face plates. Of those, probably the only truly necessary items were the shelves. I have one mounted at the top of the rack that holds all of my ISP's hardware. I wanted to keep that crap isolated. The other shelf is mounted near the bottom of the rack and holds a collection of Raspberry Pi computers that I use for various things.

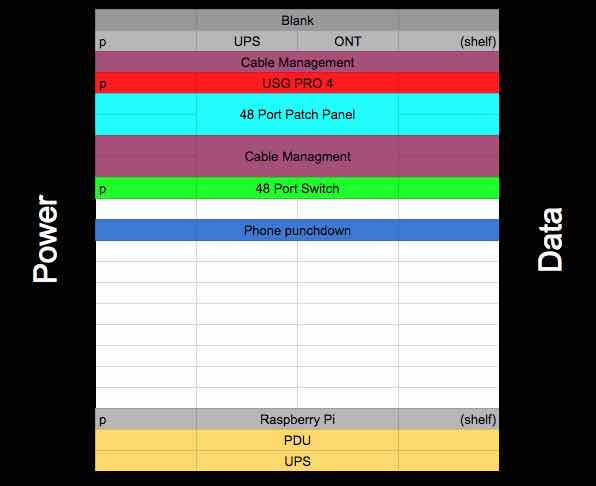
I spent a lot of time planning how to fill the rack. I didn't want network wires running all over the place, and I didn't want a mess of power cables either. In fact, I decided early on that I didn't want the networking and power cables to intermingle at all. The best tool that I found for doing this was Google Sheets (or Excel if you must). The diagram above shows the plan that I came up with to meet those goals.
When I started the process of building this infrastructure, I figured getting the rack mounted was going to be one of the easier tasks. It turned out not to be hard, but to be quite time consuming as I searched for the best setup.
