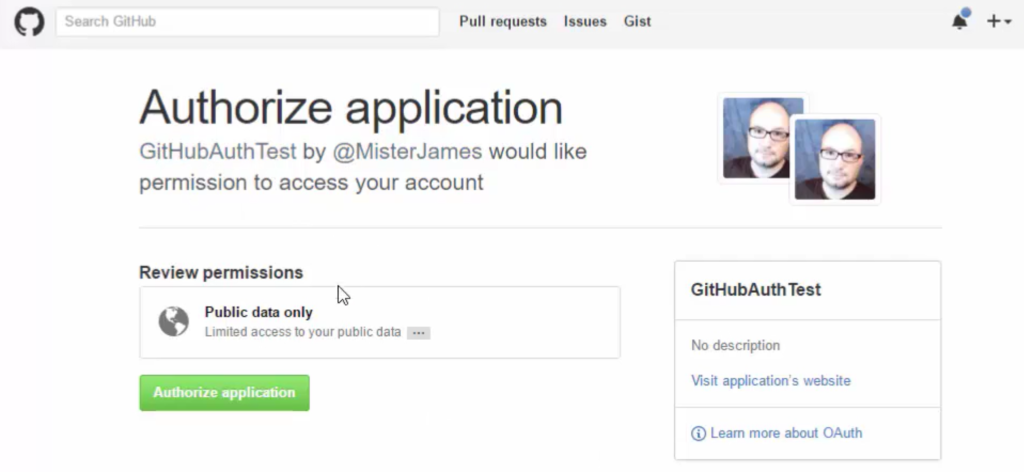
Authentication has changed over the years, and my take on it has surely shifted. No longer is it the scary, intimidating beastie that must be overcome on our projects. Today, we can let external providers provide the authentication mechanisms, giving the user with a streamlined experience that can give them access to our application with previuosly defined credentials.

Let's have a look at what it takes to allow users to authenticate in our application using GitHub as the login source, and you can check out the Monsters video take of this on Channel 9.
Background and Overview
OAuth has been known as a complicated spec to adhere to, and this is further perpetuated by the fact that while much of the mechanics are the same among authentication providers, the implementation of how one retrieves information about the logged in user is different from source-to-source.
The security repo for ASP.NET gives us some pretty good options for the big, wider market plays like Facebook and Twitter, but there is aren't - nor can or should there be - packages for every provider. GitHub is appealing as a source when we target other developers, and while it lacks a package of its own, we can leverage the raw OAuth provider and implement the user profile loading details on our own.
In short, the steps are as follows:
- Install the
Microsoft.AspNet.Authentication.OAuthpackage - Register you application in GitHub
- Configurate the OAuth parameters in your application
- Enable the OAuth middleware
- Retrieve the claims for the user
Okay, now let's dive into the nitty gritty of it.
Install the Package
First step is a gimme. Just head into your project.json and add the package to the list of dependencies in your application.
1 | "Microsoft.AspNet.Authentication.OAuth": "1.0.0-rc1-final", |
You can see here that I am on RC1, so assume there may still be some changes to the naming and, obviously, the version of the package you'll want to use.
Create the App in GitHub
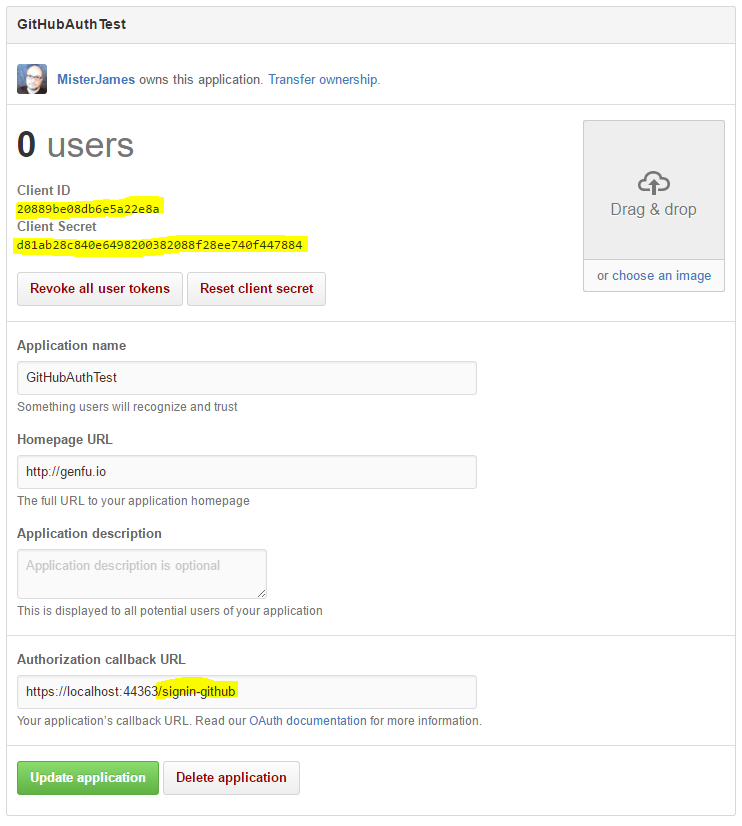
Pull down the user account menu from your avatar in the top-right corner of GitHub, then select Settings. Next, go to the OAuth Applications section and create a new application. This is pretty straightforward, but it's worth pointing out a few things.

First, you'll need to note your client ID and secret, or minimally, you'll want to leave the browser window open.
Second you'll see that I have a authorization callback setup in the app as follows:
https://localhost:44363/signin-github
This is important for two reasons:
- This will only work locally on your machine
- The
signin-githubbit will need to be configured in our middleware
If you want better control over how that is configured in your application, you can incorporate the appropriate settings into your configuration files, but you'll also need to update your GitHub app. This process is still relevant - you'll likely want something to test with locallying without having to deploy to test your application.
Configure Your Client ID and Secret
For production applications you'll be fine to set environment variables or configure application settings in Azure (which are loaded as env vars), but locally you'll want access to the config as well. You can setup user secrets via the command line, or you can just right-click on your project in Visual Studio 2015 and select "Manage User Secrets". From there, you set it up like so:
1 | { |
Enable OAuth Middleware
In the above code we also wired up some code to fire during the OnCreatingTicket event, so let's implement that next. To do this, we'll add the middleare to the Configure method in our startup class, and add a property to the class to expose our desired settings.
The middleware call is like so:
app.UseOAuthAuthentication(GitHubOptions);
And we create the property as such:
| private OAuthOptions GitHubOptions => | |
| new OAuthOptions | |
| { | |
| AuthenticationScheme = "GitHub", | |
| DisplayName = "GitHub", | |
| ClientId = Configuration["GitHub:ClientId"], | |
| ClientSecret = Configuration["GitHub:ClientSecret"], | |
| CallbackPath = new PathString("/signin-github"), | |
| AuthorizationEndpoint = "https://github.com/login/oauth/authorize", | |
| TokenEndpoint = "https://github.com/login/oauth/access_token", | |
| UserInformationEndpoint = "https://api.github.com/user", | |
| ClaimsIssuer = "OAuth2-Github", | |
| SaveTokensAsClaims = true, | |
| // Retrieving user information is unique to each provider. | |
| Events = new OAuthEvents | |
| { | |
| OnCreatingTicket = async context => { await CreateGitHubAuthTicket(context); } | |
| } | |
| }; |
Remember that callback path that we setup on GitHub, you'll see it again in our settings above. You'll also note that we're retrieving our client ID and secret from our configuration, and that we're setting up a handler when the auth ticket is created so that we can go fetch additional details about the authenticating party.
Retrieve the User's Claims
We'll have to call back out to GitHub to get the user's details, they don't come back with the base calls for authentication. This is the part that is different for each provider, and thus you'll need to write this part for yourself if you wish to use an alternate source for authentication.
We will add two parts to this; the first will call out to get the information about the user, the second will parse the result to extract the claims. Both of these can live in your startup.cs class.
| private static async Task CreatingGitHubAuthTicket(OAuthCreatingTicketContext context) | |
| { | |
| // Get the GitHub user | |
| var request = new HttpRequestMessage(HttpMethod.Get, context.Options.UserInformationEndpoint); | |
| request.Headers.Authorization = new AuthenticationHeaderValue("Bearer", context.AccessToken); | |
| request.Headers.Accept.Add(new MediaTypeWithQualityHeaderValue("application/json")); | |
| var response = await context.Backchannel.SendAsync(request, context.HttpContext.RequestAborted); | |
| response.EnsureSuccessStatusCode(); | |
| var user = JObject.Parse(await response.Content.ReadAsStringAsync()); | |
| AddClaims(context, user); | |
| } |
| private static void AddClaims(OAuthCreatingTicketContext context, JObject user) | |
| { | |
| var identifier = user.Value<string>("id"); | |
| if (!string.IsNullOrEmpty(identifier)) | |
| { | |
| context.Identity.AddClaim(new Claim( | |
| ClaimTypes.NameIdentifier, identifier, | |
| ClaimValueTypes.String, context.Options.ClaimsIssuer)); | |
| } | |
| var userName = user.Value<string>("login"); | |
| if (!string.IsNullOrEmpty(userName)) | |
| { | |
| context.Identity.AddClaim(new Claim( | |
| ClaimsIdentity.DefaultNameClaimType, userName, | |
| ClaimValueTypes.String, context.Options.ClaimsIssuer)); | |
| } | |
| var name = user.Value<string>("name"); | |
| if (!string.IsNullOrEmpty(name)) | |
| { | |
| context.Identity.AddClaim(new Claim( | |
| "urn:github:name", name, | |
| ClaimValueTypes.String, context.Options.ClaimsIssuer)); | |
| } | |
| var link = user.Value<string>("url"); | |
| if (!string.IsNullOrEmpty(link)) | |
| { | |
| context.Identity.AddClaim(new Claim( | |
| "urn:github:url", link, | |
| ClaimValueTypes.String, context.Options.ClaimsIssuer)); | |
| } | |
| } |
Unfortunately the base implementation of the OAuth provider does not support allowing us to request additional fields for the user; I'll take a look at that in a future post. All you're going to get are the basics with the above - so none of the account details beyond the email addres, nor ability to work with their repos/issues/PRs.
Next Steps
There you have it. All the chops you need to start exercising your OAuth muscle, and a basic implementation that you can leverage as a starting point. Trying this out will take you about 15 minutes, start to finish, provided you already have a GitHub account.
- Get the latest VS 2015 and ASP.NET Core bits
- Explore the ASP.NET security repo on GitHub
- Run through the samples above.
Finally, check out the Monsters' video on Channel 9 where I code this live.
Happy Coding!
