Previously: Pause to reflect
Moving to Azure Kubernetes Service - Part A
It would be great if we could get this all working in minikube and call it done, but we're not quite that lucky! We're probably going to need a platform with a bit more breathing room and additional capabilities to run our production workloads, so we'll have to figure out a way to move all of this into that platform. In our case, that platform is going to be Azure and the Azure Kubernetes Services (AKS).
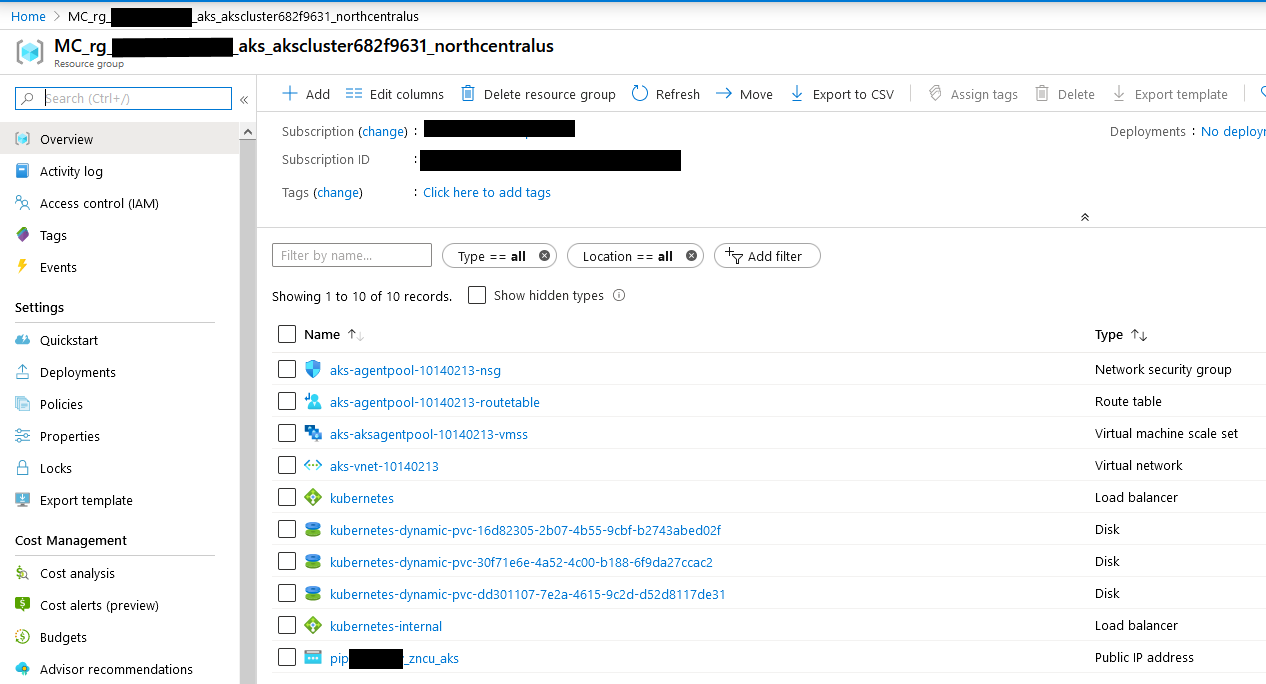
With the desire to move our resources into a new k8s cluster in the cloud, there are a lot of moving parts in the infrastructure as compared to what minikube has. Here is a picture of the basic resources we'll have in Azure after we stand up this k8s cluster.
I also had to consider managing the k8s resources (apps in manifests). I want that to be a part of any automation as well.
With all of this in mind, I knew I was going to want something more than a collection of PowerShell scripts to manage the AKS resources and the k8s resources in our cluster. Thankfully, a new product called Pulumi had recently joined the market that looked like it would fit the bill as far as ease of use, community support, and a full IaC ecosystem for me to work with.
This part of the series is mostly going to be about Pulumi, with side discussions about the specific Azure resources that we will instantiate with Pulumi.
Important Assumption
Now that we are moving our activites off of our development machines and into the cloud, it is very important that you have all of the required permissions to act (or for Pulumi to act on your behalf) in your Azure subscription. We will be creating many resources in Azure and you must have permission to create these resources.
Pulumi - Getting Started
Pulumi is a platform that includes:
- A cloud-platform that stores data about your preferences, your settings for projects (stacks), and the results of your executions.
- Multiple language-specific SDKs (see languages below) that allow you to create a Pulumi application that will run and deploy your infrastructure. You can choose the language you are most comfortable with to write your application.
- The Pulumi CLI tool that will allow you to manage your infrastructure and run your application to stand-up, tear down, or manage your project (stack).
In addition to the actual tooling, there is a tremendous amount of documentation and community support. I've generally been happy with the documentation even though I think it is still lacking in a couple places, but the community support has been really good. Pulumi has a Slack that anyone can join; it has logical channels that will generally meet your needs, and the Pulumi team have been very responsive in this slack whenever I encountered a problem.
I don't know about you, but when I have a programming problem, I skip all of the "conceptual" stuff, dive in, and thrash around a bunch. But, if you are inclined to understand the core Pulumi architecture and concepts, you should start reading here.
Creating an Account
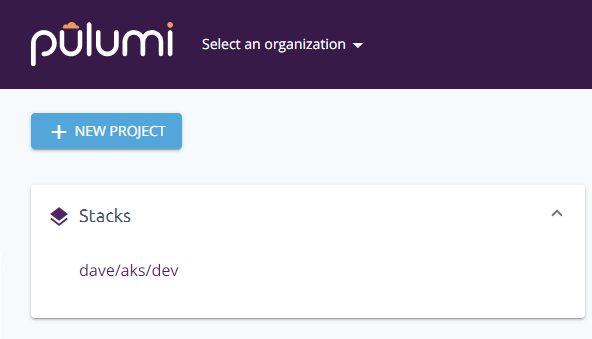
Pulumi is a platform and a part of that platform are cloud-based services, associated to an account, that stores your settings, secrets, and outcomes from deployments. Pulumi has 4 pricing tiers, the first of which is Community and is free! This is the one I'm currently using. In the Community edition, your user is basically mapped one to one with an Organization and this organziation can have stacks which are (sort of) the Pulumi term for a deployment target. These stacks are associated with deployment projects so a project can have n stacks in it. The Community SKU of Pulumi is free and so far, it has been everything I needed.
1 | Pulumi Organization |
You may already know that you need to have more than one person working on this or you may be concerned that you'll outgrow the Community edition, but you shouldn't be concerned. It looks like Pulumi has a seamless upgrade path (that I haven't used) and Pulumi also has a feature that allows you to transfer a stack to another account, so you aren't going to be stuck as you grow with the platform. Additionally, everything that you create to use Pulumi (apps and scripts) is yours and can be version controlled, shared, and re-used as you see fit. It would be quite easy to re-create a stack in a new organization as needed.
So, unless you know you are going to have multiple people involved in the IaC part of the project, you can just create a Community-based account and start deploying!
Install the Tools
Pulumi has a great set of tutorials here for getting started with Azure. I'm going to repeat some of it, but you should definitely check out their learning resources.
Now that you've created an account, it is time to start building your application! First, you'll need to install the Pulumi CLI in your development environment and sign into your cloud account.
Pulumi CLI
You have a couple choices to get the Pulumi CLI!
1 | choco install pulumi # requires chocolatey |
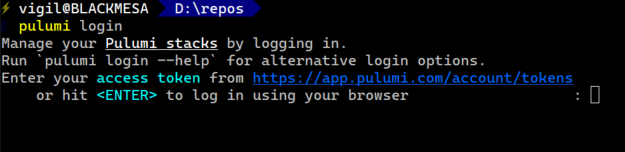
Once you have the CLI, you can login via a username/password redirect to a browser or you can use an access token that you've created in the web admin pages for your Pulumi account.
You can use the pulumi whoami to see if you are currently logged in (or who you are logged in as) as well.
Language-specific SDKs
Next, you'll need to consider what language you are going to use when creating your Pulumi application. There are many choices. Typescript/JavaScript, Go, .NET Core (C#, F#, VB), and Python. Pick whichever one your organization has the most skills in. I like Typescript so that is what I picked and what my code will be written in. If you want, you can write an SDK in your favorite language. This is all open-source.
Project Structure
Once you've selected a language, you can use the Pulumi CLI to create your first deployment project and stack. I treat a stack as a deployment that I want to put in a specific environment. For example, I would have 2 stacks for my k8s infrastructure. One is the dev infrastructure in our Development Azure subscription, and the other is the production infrastructure which would be in the Production Azure subscription. These 2 stacks stand-up all of the Azure AKS resources. I would also have 2 stacks for the k8s resources that go into those k8s clusters.
Projects are mostly containers for stacks (configuration, history) and an application. Stacks have specific configuration settings and histories that are important. The application that you run for the project can use each stack for specific deployment details.
A monolithic stack with a single app is a good way to learn and this is how most of the tutorials work. However, I found that it wasn't how I wanted to manage my deployments.
I originally created a single monolithic project with a single stack and one application but have since changed this to two projects with a single application and a dev/prod stack each. The first project for the AKS infrastructure was less volatile and I didn't need to tear it all down all the time. It takes about 18 minutes to stand-up our cluster and 10 minutes to tear it all down. The second project for the k8s resources changed much more frequently and I would often want to clear out the k8s cluster and start from a clean slate. k8s resources can be added or removed from the cluster quickly and frequently. This series will only show the multi-project approach.
First, using the Pulumi CLI, we are going to create a deployment application, in the Typescript language, for the Azure cloud, for only the AKS infrastructure. We'll do our k8s resource deployment application later.
Let's create a folder in our infrastructure folder for the AKS deployment stack.
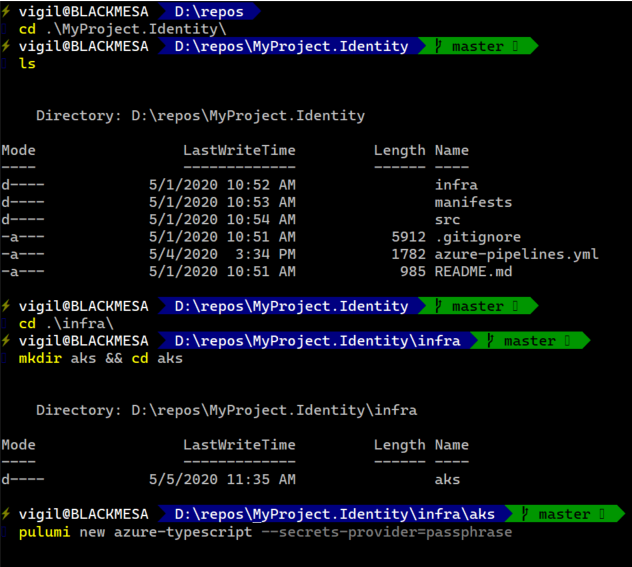
Once that is done, we can use the Pulumi CLI to build our new project with its initial stack.
pulumi new azure-typescript --secrets-provider=passphrase
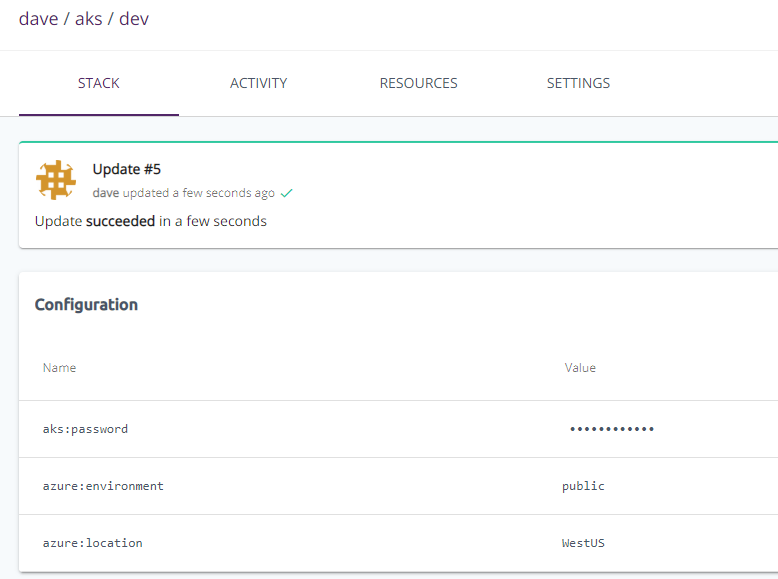
This will kick off the workflow to acquire some details before it creates the stack. In my case, I answered the workflow questions with:
- project name (aks) <-- hit enter and accepted default
- project description: Deploy our kubernetes infrastructure
- stack name: (dev) <-- hit enter and accepted default
- Enter your passphrase to protect config/secrets: P@ssw0rd!
- azure:environment: (public) <-- hit enter and accept default
- azure:location: (WestUS) WestUS
After answering those questions, the CLI will finish off by:
- creating your project and first stack
- saving them in the cloud - this happens automatically
- scaffolding out the initial application files locally
- pulling down all of the correct npm modules based on your cloud provider selection and language choices.
We can also look in the web portal for our Pulumi account and see the new stack is available there!
You can click the the stack to see what information has been published to the Pulumi cloud. There isn't much there yet, but there are some instructions on how to get more information there. We'll see that shortly.
A Note about --secrets-provider
You should have noticed that I've used the --secrets-provider parameter in the pulumi CLI invocation. If you are going to be building a single stack like many of the pulumi examples you'll find, you will not use or see this parameter. By default, each stack as a unique secrets provider and stacks cannot read each other's secrets. I already plan to have multiple stacks that I want to be able to share secrets between so I need to use this parameter in order to create secrets providers that can reach each other's secrets.
Passphrase is the simplest to use and get working so I'm using that for this article, but you can also use external 3rd party secrets providers. Support providers include:
- awskms: AWS Key Management Service (KMS)
- azurekeyvault: Azure Key Vault
- gcpkms: Google Cloud Key Management Service (KMS)
- hashivault: HashiCorp Vault Transit Secrets Engine
More details about how to use these encryption providers can be found here -- Alternate Secrets Encryption.
We will re-visit secrets in a little while. Now back to our new project.
Scaffolded Files
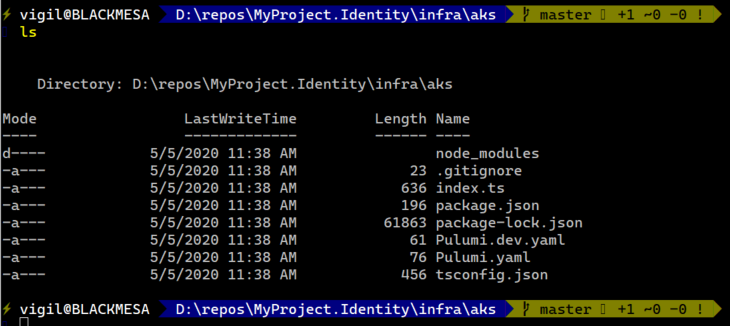
If we inspect the scaffolded application in the aks folder, we'll see the following:
| node_modules | This is where our SDK lives, we use NPM to add SDK components |
| .gitignore | Version controlled application development, just like you already do! |
| index.ts | the entry-point for our TypeScript-based IaC application |
| packages.json | The list of packages used in our application |
| Pulumi.dev.yaml | stack-specific configuration values |
| Pulumi.yaml | project-specific values |
| tsconfig.json | TypeScript application configuration |
More Tooling - azure-cli
So, we have the Pulumi CLI, maybe git CLI, and now we need to make sure we have one more tool in place. We need the azure-cli command line tool. Pulumi will use the azure-cli to actually do all of the work in the correct subscription.
You'll need to install the azure-cli with instructions here. I like the little PowerShell script that does it for you myself.
Once the azure-cli is installed, you'll need to log into your Azure subscription that you want to work with.
az login will open a browser window and help you log into your subscription.
az account list will list all of the available subscriptions (if there is more than one)
az account set <subscription name> will set the current context to the desired subscription
If you have multiple subscriptions, you'll probably spend a bit of time switching back and forth. One thing I would suggest is to be careful when working with multiple subscriptions. Pulumi, via the current azure-cli context, will happily deploy or tear-down your infrastructure when asked. There are some safe-guards in place with regard to tear-down or changing, but I've found Pulumi is always happy to stand new things up into a subscription! I accidentally installed a minecraft server into my client's development subscription this way once! Ok, maybe twice!
With Pulumi ready and azure-cli ready, we should be ready to start coding! If you haven't done this already, it's time to open VS Code or your favorite text editor!
Your first Pulumi Application
I like to open VS Code right away for a couple reasons. It is a nice text editor with excellent TypeScript support and it also has a built-in terminal window that I can set to use PowerShell Core and I can leave the directory set to the one that holds the files I'm working in.
Open your index.ts file and take a look at what the Pulumi CLI scaffolded.
1 | import * as pulumi from "@pulumi/pulumi"; // Add the Pulumi core SDK module to your application |
At the top, you'll see that two modules have been added for you. The Pulumi Core SDK module and the Azure Core SDK module. Depending on what you need, you only add the modules to your application that you are actually using. If you need additional modules, we can use npm install @pulumi/<module name> to get those SDK modules.
Next, we see code that is creating a new ResourceGroup in Azure to hold all of our new resources.
Then, we see code that is creating a new Storage account.
And finally, we have a snippet of code that is going to export the storage account's connection string for use later.
Anything that you
exportin your TypeScript will be published to the cloud for review or use by another Pulumi stack/application at a later date. If you don't want these properties publicly accessible, do not export them. We will demonstrate this later. This is important to understand when working with stacks that are dependent on other stacks.
The next step is deploying this stack! Go ahead! Type:
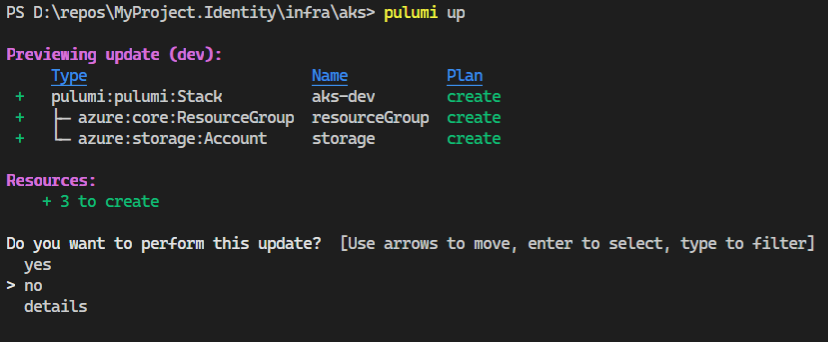
pulumi up
You will see the Pulumi CLI kick off your IaC application. It builds the app, does some analysis of what it wants to do, and then asks you if you'd like to continue!
If your TypeScript application won't build, the process stops here, and you have to fix it.
Once you accept, it finishes doing what you've coded, and it deploys your new Azure infrastructure to your subscription.
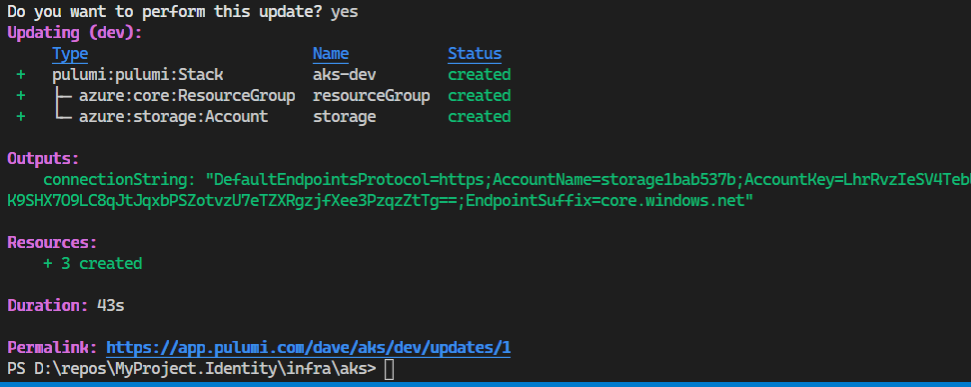
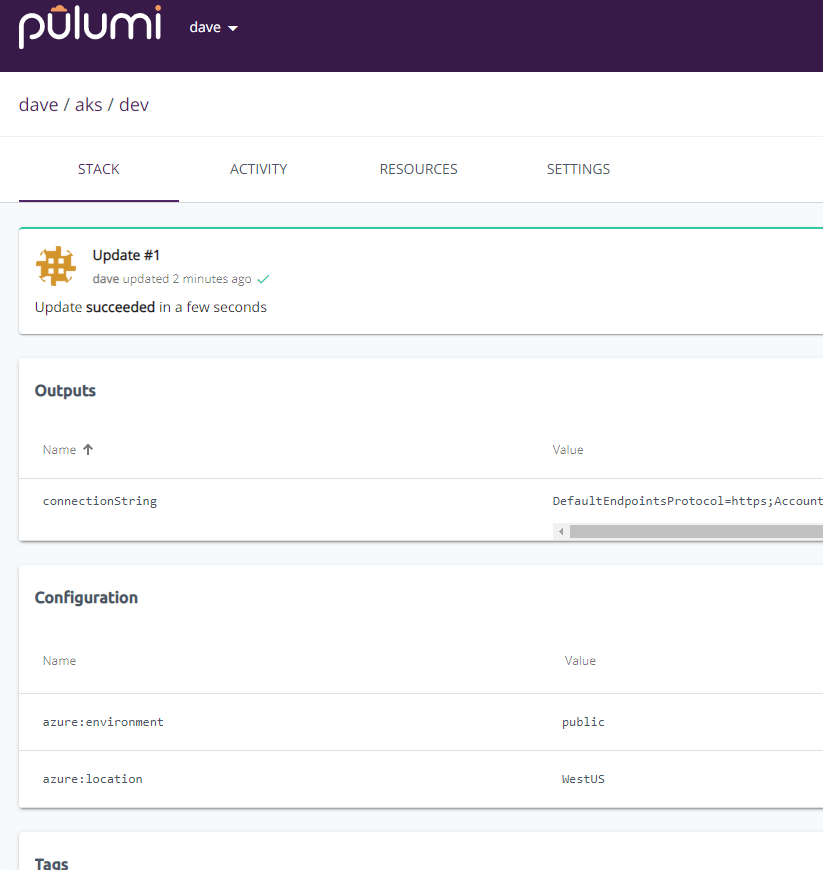
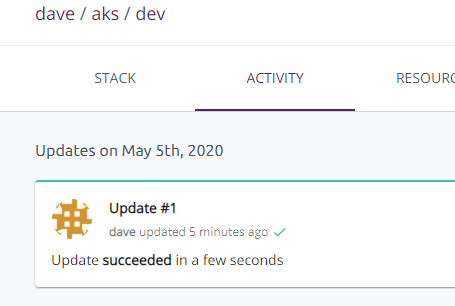
And it also publishes details into your Pulumi cloud account for this project/stack. You can see the exported connnectionString. Also available in the cloud is a historical log of what has happened in this stack in the Activity tab.
And here are the Azure resources that were created.
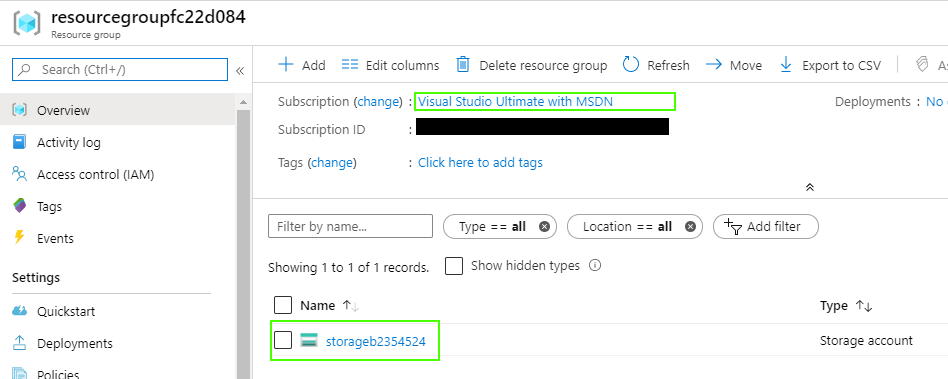
Notice that Pulumi has appended a segment of characters on your resource names to try and ensure they are unique within the subscription. I haven't tried to alter that behaviour. You can create a resource directly in Azure and import it into your stack and Pulumi will respect the name it was given.
That's pretty cool! The only problem is, I don't want a lone storage account in my Azure subscription.
So, what do we do now? Tear it all down and let Pulumi clean up everything it created.
pulumi destroy
This will ask you for confirmation, so you are protected that way. Just let the Pulumi CLI finish it's work and go look in your Azure subscriptions! It will be clean as a whistle!
Deploying an AKS
I hope that was a good introduction to Pulumi, but what we really wanted to do was build an application that would deploy our AKS into our subscription. Let's get to that.
Before getting started, delete all of the existing lines of code in your index.ts. We will not be using anything created during the initial scaffolding.
Importing more Pulumi SDK modules
Standing up an AKS service cluster is move involved that a simple storage account. We will need more SDK modules in our application in order to make that happen. Let's add some import statements into our Pulumi application.
1 | import * as azure from "@pulumi/azure"; |
This is what the top of you index.ts should look like. If you are doing this in VS Code, you probably have some red squiggly lines under the bottom two imports. This is where we ask NPM to go get those modules for us!
npm install @pulumi/kubernetes Get kubernetes module of the SDK
npm install @pulumi/azuread Get Azure ActiveDirectory module of the SDK
Once that is done, the red squiggly lines should go away and you'll see that you can use those SDK modules in your application now.
Initial Configuration Values
The next part of our app initializes and exports configuration variables that we'll need for the AKS provisioning. The names for these variables are intended to be informative, but they are names that I've chosen. The values are determined by the intended usage. Azure expects some of these values to be specific, such as location or nodeSize. The nodeCount variable needs to be an int. The string const values that I export are for consistency in the same way that you would have an enum or a class containing consts values in a C# application. I believe this initial list of variables are the bare minimum you need to create a cluster. You may eventually have many more in your application.
This is what the configuration section will look like when it is complete. We will add these lines of code into the application as we work though the configuration setup so that we can pulumi up multiple times and see the incremental changes.
1 | // Acquire stack configuration values and export application-defined configuration variables |
Pulumi Config Object
const config = new pulumi.Config();
The first thing we do is ask the Pulumi SDK to get our stacks configuration in the form of an object of type pulumi.Config. This object lets us get configuration values (secret/non-secret) for our application, specific to this stack, from the Pulumi cloud. You're probably wondering how they got there though?
The Pulumi CLI has a number of methods that allow us to manage our stack configuration values. In this case, we need to get 5 different values from the cloud.
Passwords and Secrets
Here we get to meet another part of the Pulumi cloud infrastructure. Stacks can contain plaintext configuration information, and they can also contain secret configuration information. We can acquire this configuration information from the cloud when our application runs in order to provision our cluster. Let's work through this for a moment.
This password will be used for our administrative user in our AKS cluster. We probably don't want this to be saved as plaintext anywhere, so we're going to use the --secret flag when we use the Pulumi CLI to set this configuration value in our stack.
1 | pulumi config set password --secret [your-cluster-password-here] # P@ssw0rd! |
This command tells the Pulumi CLI to set a property on our stack configuration called password to the value provided and make sure it is treated securely.
Since we delete all of the text, let's pulumi up and get that value into the cloud to see what happens.
Other than the initial pulumi new azure-typescript CLI command, any changes we make to our local context wil not be available in the web portal until we use the
pulumi upcommand.
In order to access this secret from the pulumi.Config object, we add this line of code to our application.
const password = config.require("password");
You can use config.requireSecret("password") to mark a variable as secret and at that point it's safe to export because it will always be encrypted/masked (in the state as well as CLI and console)
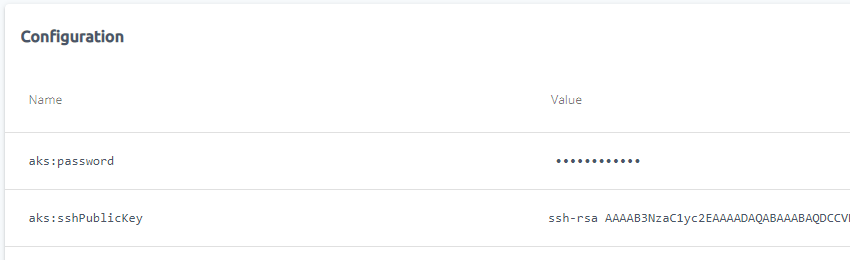
SSH Public Key
If you'd like to be able to SSH into your linux nodes (VMs) that are in the cluster, you'll need to provide an SSH key that is provisioned into your nodes. Using a tool called ssh-keygen we can create an SSH key and then we can put that key into our Pulumi stack config for use anytime we create the cluster.
1 | ssh-keygen -t rsa -f key.rsa |
ssh-keygen will walk you through the process of creating an SSH key.
Then we will use the Pulumi config to set the sshPublicKey configuration variable on the stack. If you are running a PowerShell terminal, this won't work. PowerShell doesn't like the < operator. You can get around that by using this command.
cmd.exe /c "pulumi config set sshPublicKey < key.rsa.pub"
Now you can pulumi up and go take a look at your configuration in the web portal again.
In order to use this variable in our application, add this line of code to our application.
const sshPublicKey = config.require("sshPublicKey");
Location, NodeCount, NodeSize
Azure is going to want to know:
- What region to create your resources in
- How many nodes do we want in our cluster
- What VMs SKUs (size) do we want to use for our cluster
The location configuration value is interesting!
1 | export const stackLocation = config.get("stackLocation") || (config.get("azure:location") || "WestUS"); |
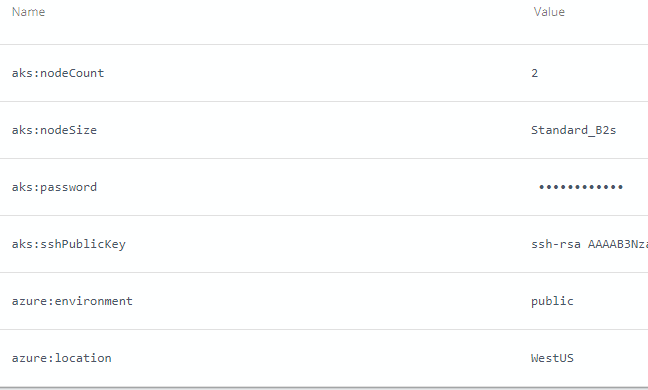
In this code, we look for a configuration value called stackLocation that we can set if we want. This supports DR/HA-specific stack scenarios that I'll discuss later. If it isn't present, we can use the the default location set in the azure:location configuration value that was set for us when we created the project. You can take a look again with the Pulumi CLI command pulumi config get "azure:location" or you can look in the web portal as well. In the event that there is no configuration values, we've provided a fallback value of WestUS.
I love being able to use programmatic logic in my infrastructure deployments!!
az account list-locations will list supported regions for the current subscription. It will spit out a JSON blob of regions and you can use the name property. It seems that commands that take a region parameter name are case-insensitive.
In order to create a k8s cluster, we need VMs (nodes) in the cluster. We can configure how big we want cluster to be and store that data in the stack configuration. Our fallback value is 2.
pulumi config set nodeCount 2
A k8 cluster only needs 1 node to operate. This is certainly sufficient for dev contexts, but you probably want 3+ nodes in production.
Add export const nodeCount = config.getNumber("nodeCount") || 2; to the application.
Azure also needs to know what SKU our nodes (VMs) should be.
az vm list-skusis the azure-cli command that will list out all of the SKUs you can pick from but it spews an enormous JSON blob that lists them all and their capabilities. You're probably better off visiting here to help you decide what SKU to use.
pulumi config set nodeSize Standard_B2s
Add export const nodeSize = config.get("nodeSize") || "Standard_B2s"; to the application.
Again, we provided a fallback value in the application.
pulumi up and look at the configuration values in the web portal.
Exports From Your Application
Finally, we want to provide some const values that will be available in the stack, displayed in the web portal, and also available to any other stack that belongs to the Pulumi organization.
1 | export const storageClassName = "managed-premium"; |
pulumi up and you'll see all the rest of our configuration values in the web portal. Exports are shown in a different group in the web portal. The are considered outputs of the stack.
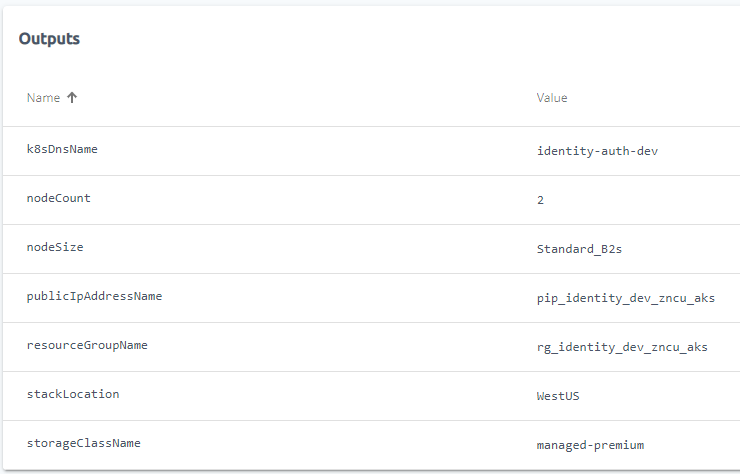
You should recognize when you export a value that you will get a value in the outputs section of the web portal and it also be in the config. You don't have to export
constvalues if you want to avoid that confusion.
Getting the Azure Subscription Id
We need one more value for our application and that is the subscriptionId. In this case, we could use the pulumi config set command to manually set it, but we can get the subscription from the Azure context that we are already connected to. This is exposed via an SDK component.
1 | // getClientConfig is an async call, so wrap in pulumi.output |
Add AKS resources to Azure
Now that we have the basic configuration values that are required for our AKS cluster resources, we can start to add them into our Pulumi application.
After each section, you can
pulumi upand see what happens. When you are done that increment, you canpulumi destroyto clean up the resources.
A Pre-Defined ResourceGroup
While Pulumi is quite capable of building a ResourceGroup from scratch, you may want to use one that already exists in your Azure subscription. Financial reporting, permissions, operational activities, etc may be leveraging ResourceGroups in this way. For this example, we are going to use a pre-existing ResourceGroup. This code is also the reason that we acquired the subscriptionId and set the resourceGroupName in our configuration section.
You will need to create this ResourceGroup in Azure via the azure-cli or in the Azure Portal. The `azure-cli command is
1 | # this resourceGroupName matches our const value in the config section |
Here is the code to get the resourceGroup object for using in the application code.
1 | // get the Azure Resource Group |
TypeScript string interpolation doesn't work very good with Pulumi Output
objects. You need to use the pulumi.interpolate syntax to create strings from Output
Creating an Azure Service Principal
Your new AKS service instance is going to need to be able to create a lot of Azure resources. It will do all of this for you, but in order to create these resources, it will need to log in as a Service Principal that you've created in your subscription. The first thing we'll do is get our application to create that Service Principal.
1 | // Original example: https://github.com/pulumi/examples/blob/master/azure-ts-aks-helm/README.md |
We are not exporting any of these values. We won't need to see them in the Pulumi web portal or use them in any other project or stack. You can see this application and Service Principal in the AAD that your subscription is connected to.
Creating an AAD Service Principal sometimes takes a bit of time. Operations that depend on the SP being created (the AKS Service creation code) may fail until the SP is finished being created. If this happens, simply
pulumi upagain.
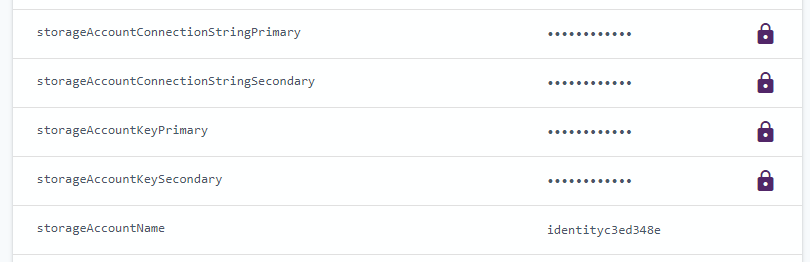
Storage Account for Database backups
Our business problem requires a database and a good thing to do once in a while is backup that database and put those backups somewhere. For this activity, we are creating an Azure Storage Account, in our AKS specific resource group, that we will use as a volume in the pgAdmin4 pod.
1 | // Create storage account for Azure Files |
You'll notice that during the creation of the storage account, we get back the connection strings and keys which we'll need to use later on. We can use the pulumi.secret() method to ensure that these are treated as secrets by the Pulumi cloud infrastructure.
Azure Kubernetes Service
We are finally going to create our Azure Kubernetes Service (AKS) instance! w00 h00!! Or I should say, we're going to code it up in Pulumi and we'll let Pulumi take care of creating it!
1 | // Creates an AKS cluster. |
This is a pretty simple pulumi declaration given everything it took to get here. You'll notice the following parameters are mostly using our configuration. This is important when we add additional stacks (deployment target environments):
- resourceGroupName
- kubernetesVersion: "1.17.3"
- you can only use kubernetes versions supported by Azure. This is the most recent at the time of writing
- location
- nodeCount
- vmSize
- dnsPrefix
- sshKey
- servicePrincpal
- generated during creation
One of the things that does happen when Azure creates this AKS instance is that the cluster will use the Service Principal to create all of the resources and that all of the cluster resources will be placed in a in an auto-generated ResourceGroup. I haven't discovered to how to alter this behaviour. The name of the resource group that you create the AKS service in will be a component of this auto-generated ResourceGroup's name.
If you
pulumi upafter this section be aware that creating a cluster takes time and requires the Service Principal to exist as well.pulumi destroyalso takes a few minutes to run when an AKS instance is involved.
Interacting with Kubernetes in our Cluster
Now that we have an k8s cluster running, we need to start interacting with the cluster and not Azure. In order to do that, we need a Pulumi object that is comparable to kubectl. In Pulumi, this is the k8s.Provider object.
1 | // Expose a k8s provider instance using our custom cluster instance. |
In this code, you can see that we create a k8s.Provider instance using the kubeConfig that we can get from our AKS cluster instance. We also want to export that kubeConfig so that we can use it in our next Pulumi application that will create all of the k8s resources in the cluster. Remember, the kubeConfig is credentials to get into your cluster, so you should treat it as a very important secret.
I've also exported the new clusterName and a helper output value of the az aks get-credentials command that will help you put your new k8s credentials in your local kubeConfig file.
We will use the k8sProvider object in the remainder of this script to interact with our k8s cluster.
Kubernetes Secrets
The finish our basic AKS deployment, I am going to install a couple secrets that our k8s cluster will need to operate.
For our Azure Container Registry secrets, we need to get the ACR instance, ask it for it's secrets, and put them into k8s. This is the safest way to manage these secrets since we don't want them in our code base.
Please treat these and all other secrets with all due care.
1 | const acrInstanceName = "depthconsulting"; |
There is a help function that we are using that hides the complexity of this.
1 | export function createImagePullSecret( |
We will also need to create a way for our k8s cluster to connect to the various storage providers that are available to us in Azure. In this case, we want to enable k8s to connect to the file storage we are going to use for our database backups. This uses some of the variables that we captured when creating our Storage Account as well as a helper function.
This is the kubectl command that would create this secret.
kubectl create secret generic azure-secret --from-literal=azurestorageaccountname=$AKS_PERS_STORAGE_ACCOUNT_NAME --from-literal=azurestorageaccountkey=$STORAGE_KEY
Now we convert that into a TypeScript function.
1 | const azureStorageSecret = helpers.createAzureFileSecret( |
Here is a helper function that will create the secret properly for us.
1 | export function createAzureFileSecret( |
I'll eventually make this a more generic mechanism for creating secrets.
Our Full AKS Application
We have now completed our whole Pulumi application that will stand up a basic AKS cluster in Azure. Here is the entire script for completeness.
1 | import * as azure from "@pulumi/azure"; |
A last pulumi up and you should have your AKS cluster completely provisioned in your Azure subscription.
Creating a Production Stack
One of the things about using a Pulumi application with multiple stacks is that each stack holds environment-specific configuration, so we can re-use our application for different environments via stacks. You will probably create your dev and prod stacks, but you could also manage your Disaster Recover(DR) or High-Availability (HA) (different region) as stacks as well.
In this case, we're going to use the Pulumi CLI to create a prod stack for our k8s infrastructure. To create a new stack, the command is:
pulumi stack init prod
We can list all available stacks in a project using:
pulumi stack ls and selecting a different stack is pulumi stack select <stack-name>
Once our production stack is created, we can set all of the pulumi config variables that are required for the stack to operate and voila! We can create a prod deployment of our AKS infrastructure that should look exactly like our dev stack infrastructure.
Summary
This has been a very long post! I hope you've been able to successfully deploy your AKS instance. We will need it for the next article in this series where we put our resources into that k8s cluster!
A Note about Log Analytics
In your research about AKS you will probably come across examples that show attaching Log Analytics instances to your AKS cluster.
I did this and a week or so later, I was looking at costs in my Azure subscription and I saw that our AKS resource group had cost way more than I expected! Digging into the reasons, I found that Log Analytics actually cost more than our AKS VM resources! I immediately turned it off. Log Analytics is too expensive for us at this point in time. Perhaps when you have a large Kubernetes installation it is worth it, but right now, our Log Analytics bill couldn't be justified!
When I was turning it off, I wanted to make sure that we removed all traces of it from our subscription and the AKS cluster. First, I deleted the Log Analytics components in Azure. The cluster still worked! Great! Stop the billing and keep everything working. Then I wanted to clean out all of the omsagents from the cluster, but those pods/deployments/services are impossible to remove from the AKS Cluster. I'm guessing that something on the outside that is managing the cluster is watching them and putting them in there all the time. I had to do something else, which lead me to this document.
For the time being, because I have a lot of internal logging happening in the cluster and I don't want to spend more money on monitoring than the cluster itself, I'll just leave it off and recommend that you start without it.
If you do want Log Analytics in your AKS cluster, you can add this code into your application...
1 | // Setup log analytics for k8s |
... and un-comment out these JSON parameters in the AKS cluster creation method.
1 | /* This is commented out because we do not want to do this. Please see my |
