Last week I worked on getting Octopus Deploy's Build Task installed in TFS 2015. What I found was that there was a lot of great articles that all had parts of the process, but there was nothing that brought all the steps together. So here's my list, complete with links to the various posts/blogs with the details.
Step 1 - Add OctoPack To Your Project
OctoPack is... "The easiest way to package your applications from your continuous integration/automated build process is to use OctoPack. OctoPack adds a custom MSBuild target that hooks into the build process of your solution. When enabled, OctoPack will package your Windows Service and ASP.NET applications when MSBuild runs." (from http://docs.octopusdeploy.com/display/OD/Using+OctoPack).
OctoPack creates a nice little NuGet package out of your project which gets consumed by Octopus Deploy (which uses its own Nuget server under the hood to facilitate deployments). You can install OctoPack by adding it as a Nuget package in Visual Studio and you should add it to all the projects you'll be deploying. As an example, you'd add it to your web project but not to your unit test project.
Step 2 – Create an API Key
You'll need this API key for setting the Visual Studio Build step's MSBuild arguments in the next step. To generate this, follow the instructions on this help doc:
http://docs.octopusdeploy.com/display/OD/How+to+create+an+API+key
Step 3 - Modify the MSBuild Arguments in your Visual Studio Build Step
Over in TFS, you need to add some arguments to the MSBuild Arguments field in your Visual Studio Build step.

The arguments you need to use are:
/p:RunOctoPack=true
/p:OctoPackPublishPackageToHttp=http://<path to octopus>/nuget/packages
/p:OctoPackPublishApiKey=<api key you generated in step 2>
Step 4 – Create a Generic Connected Service
You need a generic service for the custom task to work. This service and your team project will share the same API key, which lets your build kick off the deployment via the service.
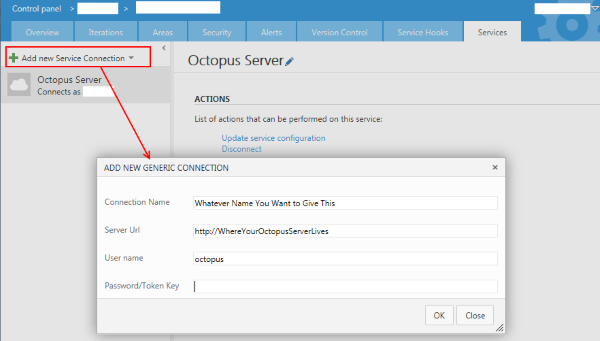
To create one, go into your team project and click the little gear icon in the top right corner (next to your user name). This will take you to the admin page, where you should see a number of tabs like Overview, Iterations, etc. Services will be the last one, click it.

On the Services page, click "Add New Service Connection" and select General. Fill in the values into the form that appears:
Connection Name: Whatever you want to name this service connection.
Server URL: Where your Octopus server is
User name: Just put Octopus. Why? Dunno, that's what this post told me to do.
Password/Token Key: Past in the API key that you created a few steps ago.
Step 5 – Install Node and NPM (for TFX-CLI)
Installing the Octo Build Task for Visual Studio Online is super easy, but for on-premise it requires some extra steps. To install the task (or any task for that matter, see the links at the end of this post for more info on that) you need a tool called TFX-CLI (TFS Cross Platform Command Line Interface). This is a tool that lets you do various things with TFS from a console, but it requires Node.JS and NPM.
Node is a JavaScript runtime and NPM is a package manager (think Nuget, Chocolatey, etc.).
So before you install TFX-CLI, you need Node and NPM on your system. Note that this doesn't need to be installed on your TFS server. As long as you have the proper permissions, you can install this locally on your machine and just connect to your TFS box.
To install Node, just head to their website and click on the download links. NPM should install with it by default. https://nodejs.org/en/
Step 6 – Install TFX-CLI
Once you have Node and NPM installed, you can install TFX-CLI using NPM. Just open a command prompt and type in
npm install –g tfx-cli
You need to have an internet connection for this to work, as its going out and getting the latest copy.
Step 7 – Enable Basic Authentication on TFS
You can connect using TFX-CLI in two ways – with a personal access token (VSO) or with Basic Authentication. Microsoft NTLM isn't supported for TFX-CLI yet, so while you'll be passing in your domain credentials you'll be doing it over "basic" auth. Note that if you want to secure it (i.e. SSL) then you have to do that yourself manually, you don't get it out of the box.
Check out this help file from the TFX-CLI project site for a walkthrough on setting up basic authentication. https://github.com/Microsoft/tfs-cli/blob/master/docs/configureBasicAuth.md
One thing I will call out – make sure you set the basic auth at the web application level and not the web site level, otherwise you'll just get invalid login responses in TFX-CLI.
Step 8 – Clone the OctoTFS repo from Github
Pull down the OctoTFS project from Github. You'll need Git installed for this to work (https://git-scm.com/).

Here I'm putting the OctoTFS project in a folder called "OctoTFS" in my C: drive.
Step 9 – Login to TFS in TFX-CLI and Upload the Octopus Build Task
FINALLY we can get the Octopus Build Task installed in TFS!
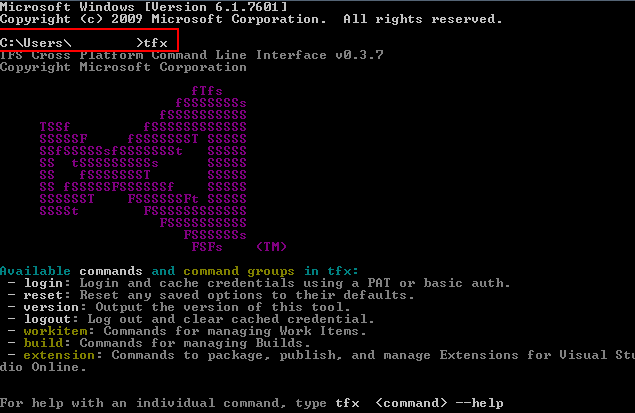
First, log in to TFX-CLI. Open a command prompt and type...
tfx
at the prompt (without the quotes). You should see this when you hit enter:

Now you need to log in to your TFS server. Type tfx login –auth-type basic.
You'll be asked to enter in the Service URL, which is the URL to the TFS collection you want to connect to. For your username and password, enter in your domain credentials or if you have a local account on the TFS server log in with that.

All of this has been leading up to this next moment – installing the build task! In the command line navigate to the OctopusBuildTasks folder. See the image below for the path where I installed mine earlier – if you follow the same steps, it should be there for you as well. Once you're there, type...
tfx build tasks upload
This will prompt you to put in the task path, which is one level below. Type...
./CreateOctopusRelease
and hit enter. You should see green text saying that the build task was uploaded successfully!

Step 10 – Verification
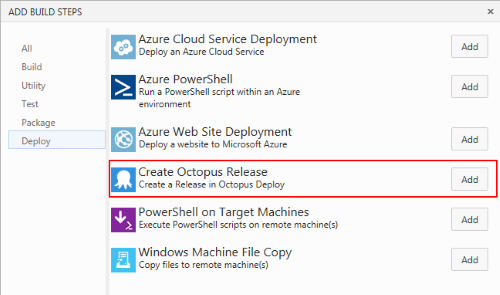
Head over to your TFS instance and bring up one of the projects within the collection you specified. Edit one of the builds (or create a new one) and add a deployment step. You should now see the Octopus Deploy Build Step as an option!

Conclusion
TFS will have to suffer through awkward deployment scenarios like this compared to the ease of installation that Visual Studio Online provides (adding this build task to VSO is automated and requires only a few button clicks to install). While it's great that we have tools like TFX-CLI, better (and updated) documentation would go a long way to help those of us trying to get as much out of our on-prem TFS.
You may be wondering why this isn't documented anywhere already. There actually is a lot of documentation out there about this process, but none that covered everything start to finish. Hopefully anyone else looking to get this working in their on-prem TFS environment can avoid some of the pain I went through (or even better, the install process for custom build tasks improves and this whole post becomes irrelevant).
If you're intrigued at the idea of creating your own custom build tasks now that you know how to install them, Colin Dembovsky has a great series of blog posts that will walk you through that process, definitely check it out at the links below:
http://colinsalmcorner.com/post/developing-a-custom-build-vnext-task-part-1
http://colinsalmcorner.com/post/developing-a-custom-build-vnext-task-part-2
